Geant4(GEometry ANd Tracking,几何和跟踪) 是由CERN (欧洲核子研究组织) 基于C++面向对象技术开发的蒙特卡罗应用软件包,用于模拟粒子与物质的相互作用,在高能物理、加速器、核物理、辐射防护等多个领域都有着广泛的应用。
安装 环境要求 MSVC MSVC版本为19.X.X.X,不要求Visual Studio版本为VS 2019,通过在VS中打开isual Studio Tools (工具) → Developer Command Prompt for VS201X (Visual Studio 命令提示)可以查看MSVC版本:
1
2
3
4
5
>cl 用于 x86 的 Microsoft (R) C/C++ 优化编译器 19 .31 .31104 版 版权所有(C) Microsoft Corporation。保留所有权利。 用法: cl [ 选项... ] 文件名... [ /link 链接选项... ]
Qt Qt5,目前暂不支持Qt6,推荐使用Qt 5.15 LTS。
安装前准备 CMaKe 推荐使用Scoop 进行安装,可以方便的进行版本更新,自动添加环境变量等:
Qt(可选) Qt 是一个可选项,可以美化Geant4的GUI显示,注意版本必须为5.X.X,目前最新的 LTS 版本是5.15.3。从下载页面 获取在线安装程序,本过程需要Qt账号,可以提前在官网注册好。
在选择组件界面可以选择Qt的版本,以5.15.2为例,我们只需要其中的MSVC 2019部分,其余可根据需要自行选择:
安装完成后,找到安装目录下的动态链接库目录,如D:\Qt\5.15.2\msvc2019_64\bin,将其添加至环境变量中的PATH。
Geant4 从Github下载Geant4的源代码文件,解压至D:\Geant4\source目录下。
编译安装 无 Qt 无Qt版本的编译安装较为简单,进入D:\Geant4目录,创建build文件夹并进入:
1
2
3
4
5
6
> cd D:\Geant4 > mkdir build > dir /B build source > cd build
随后运行CMaKe:
1 cmake -DCMAKE_INSTALL_PREFIX="D:\Geant4\disk" "D:\Geant4\source"
其中CMAKE_INSTALL_PREFIX用于设置安装路径,即安装Geant4库、头文件和支持文件的目录,必须为绝对路径 。后者为源代码的目录,可以为相对路径。Geant4还有很多的可选编译选项,可以查阅 Geant4 Build Options 。
1
2
3
4
5
6
7
8
9
10
11
12
13
14
15
> cmake -DCMAKE_INSTALL_PREFIX="D:\Geant4\disk" "D:\Geant4\source" -- Building for : Visual Studio 17 2022 -- Selecting Windows SDK version 10 .0 .19041 .0 to target Windows 10 .0 .19043 . -- The C compiler identification is MSVC 19 .31 .31104 .0 -- The CXX compiler identification is MSVC 19 .31 .31104 .0 ...... -- The following Geant4 features are enabled: CMAKE_CXX_STANDARD: Compiling against C ++ Standard '17' GEANT4_BUILD_MULTITHREADED : Build multithread enabled libraries -- Configuring done -- Generating done -- Build files have been written to : D :/Geant4 /build
一般情况下你会看到警告,这只是一个建议项,提醒我们安装进行模拟所必须的数据文件,不影响后续的安装,可以等到安装完成后自行下载解压。
1
2
3
4
5
6
7
8
*WARNING* Geant4 has been pre-configured to look for datasets in the directory: D:\Geant4\disk\share\Geant4-11.0.1\data but the following datasets are NOT present on disk at that location:
经过上面的步骤,CMaKe会生成一个Visual Studio的解决方案,当然我们也可以通过命令行直接进行安装,注意我们选用了Release项,这是因为Geant4的Debug配置优化不是很好,不能带来最佳的性能。
1 > cmake --build . --config Release --target install
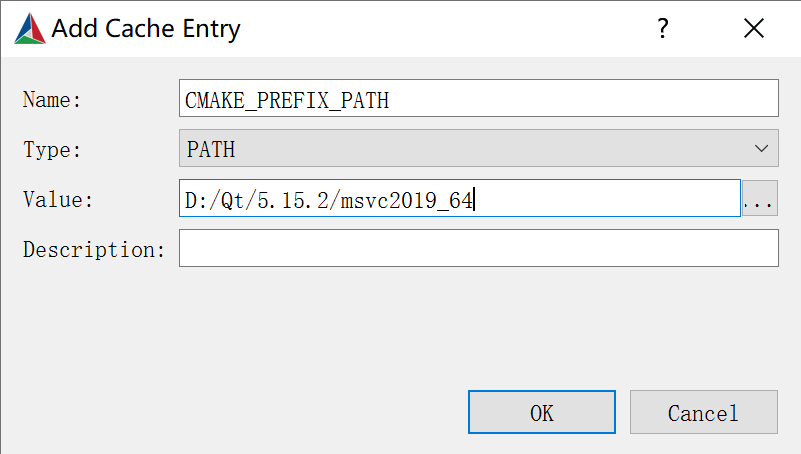
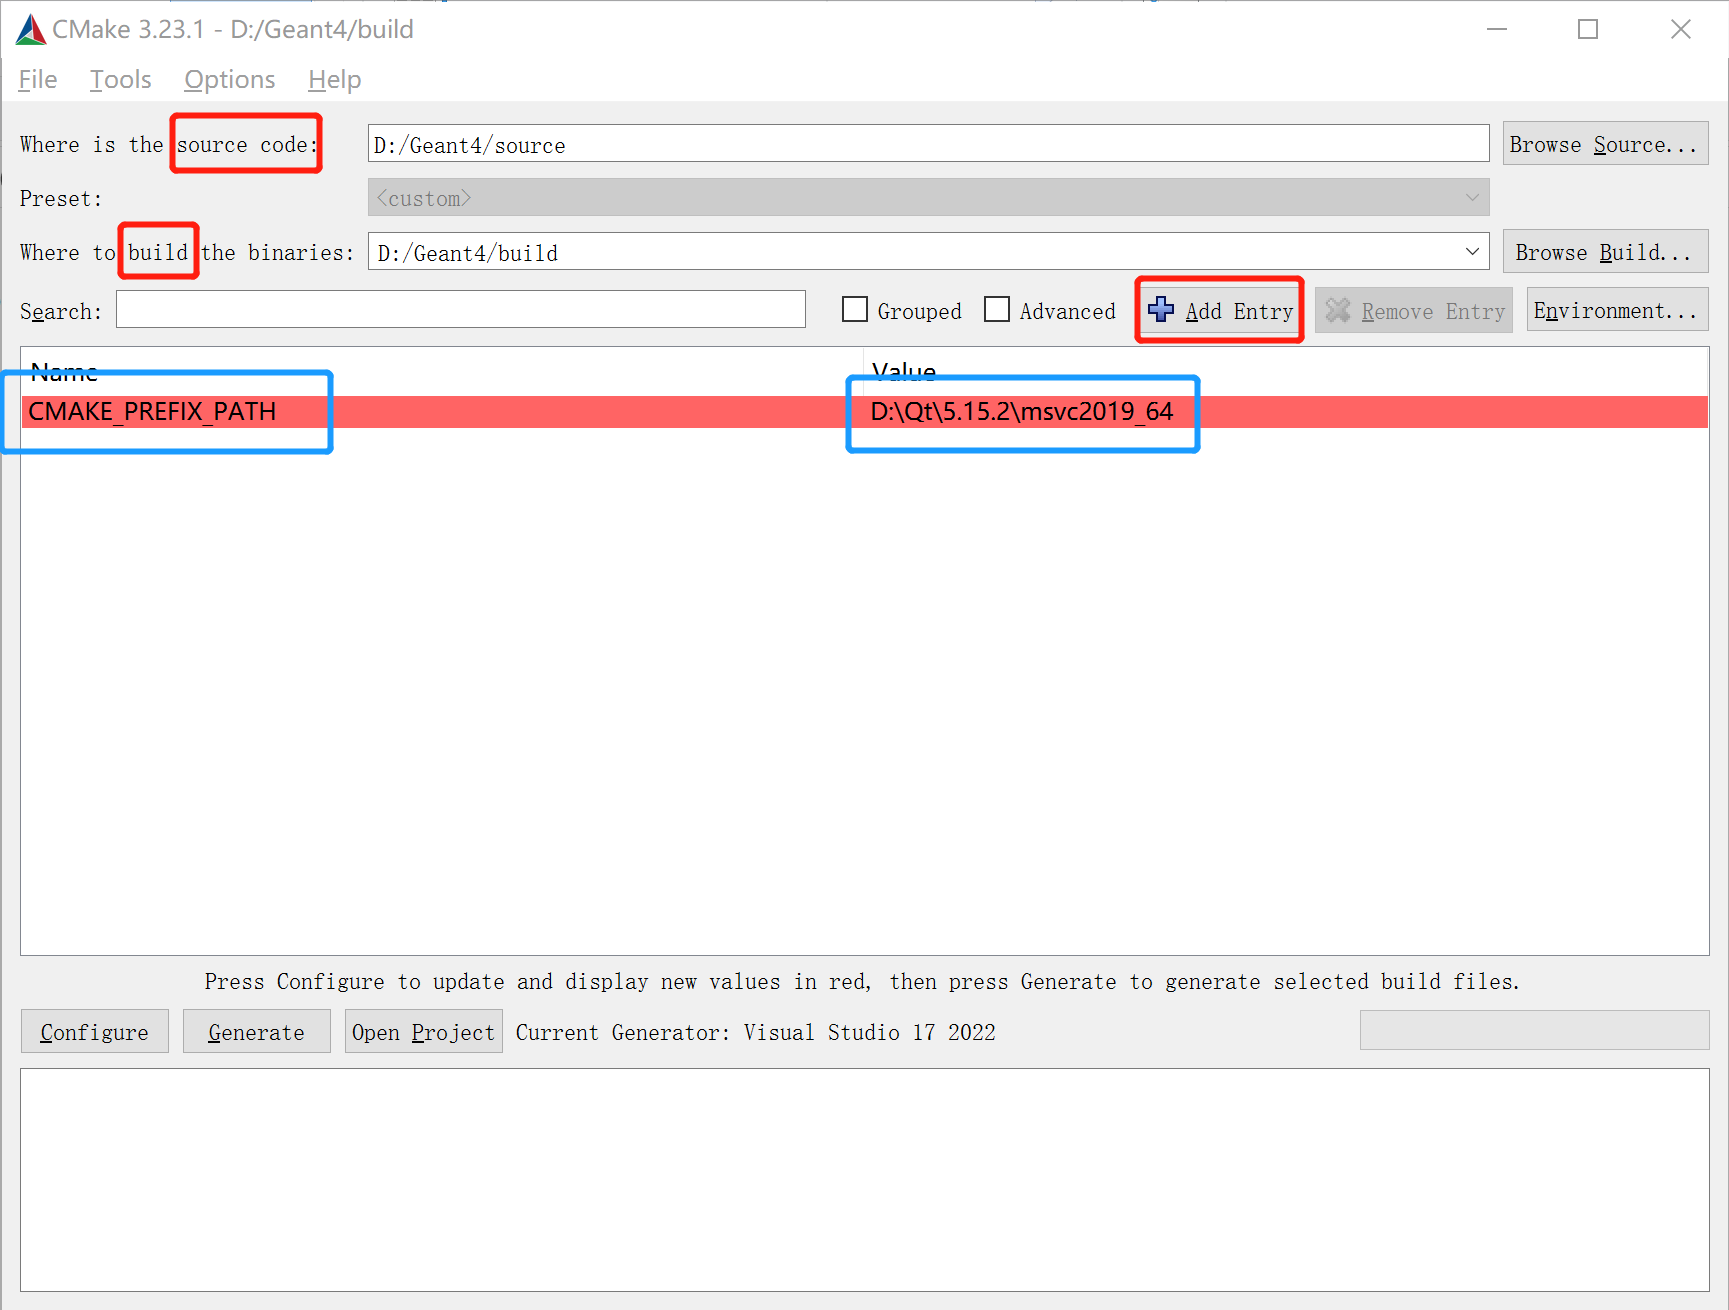
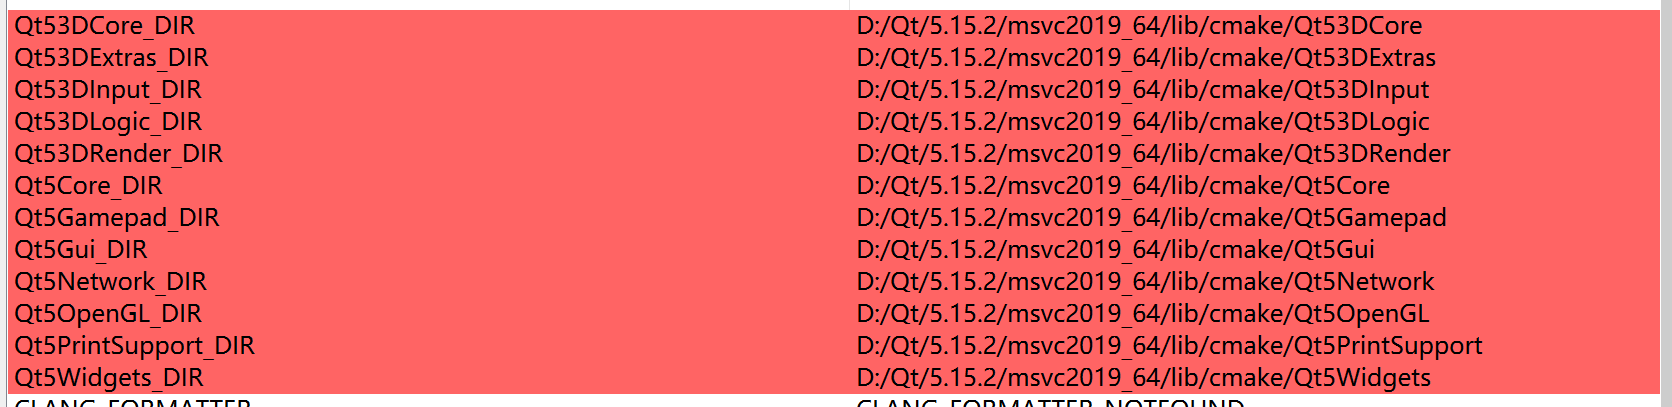
Qt 带有Qt的编译安装较为繁琐,所以我们可以借助CMaKe-GUI进行配置。选择源代码目录D:\Geant4\source和构建目录D:\Geant4\source后,我们添加一个配置项为CMAKE_PREFIX_PATH,类型为PATH,值为Qt动态链接库的上一级目录(如D:\Qt\5.15.2\msvc2019_64),随后点击左下角的Configure按钮。
图 2 CMAKE_PREFIX_PATH 配置项 随后,我们在自动添加的配置项中,将CMAKE_INSTALL_PREFIX(安装目录)设置为D:\Geant4\disk,将GEANT4_BUILD_MULTITHREADED(多线程编译)勾选,将GEANT4_USE_OPENGL_WIN32和GEANT4_USE_QT勾选启用Qt,再次点击左下角的Configure按钮,CMaKe会自动帮助进行Qt的进一步配置,确认无误后再次点击左下角的Configure按钮,当所有的配置项均变为白色时,则配置完成,点击Configure右侧的Generate进行生成。
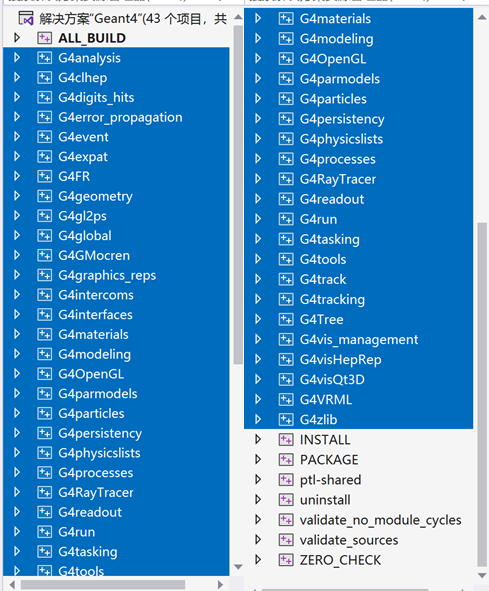
点击Generate右侧的Open Project在Visual Studio中打开项目,在解决方案资源管理器中,选中ALL_BUILD到INSTALL中间的所有项目,打开属性(上端的扳手按钮),启用多处理器编译选项。
然后在ALL_BUILD项目上点击右键,再点击生成 (Build),等待结束后在INSTALL项目上点击右键,再点击生成 (Build),即可完成编译安装。
安装后配置 在环境变量中添加D:\Geant4\dist\bin。
在Download 页面下载好数据文件,目前总计 12 个,约 2G 大小,将其解压至D:\Geant4\dist\share\Geant4-11.0.1\data目录下(data文件夹可能需要自己创建),解压后目录结构如下:
1
2
3
4
5
6
7
8
9
10
11
12
13
14
15
D:\GEANT4\DIST\SHARE\GEANT4-11.0.1\DATA |---G4ABLA3.1 │ |---*.dat │ `---sub directory |---G4EMLOW8.0 |---G4ENSDFSTATE2.3 |---G4INCL1.0 |---G4NDL4.6 |---G4PARTICLEXS4.0 |---G4PII1.3 |---G4SAIDDATA2.0 |---G4TENDL1.4 |---PhotonEvaporation5.7 |---RadioactiveDecay5.6 `---RealSurface2.2
随后运行D:\Geant4\dist\bin目录下的geant4.csh文件,复制设置环境变量的一段,并进行修改,将结果保存至reg.bat文件中并运行。
1
2
3
4
5
6
7
8
9
10
11
setx G4NEUTRONHPDATA D:/Geant4/dist/share/Geant4-11.0.1/data/G4NDL4.6 setx G4LEDATA D:/Geant4/dist/share/Geant4-11.0.1/data/G4EMLOW8.0 setx G4LEVELGAMMADATA D:/Geant4/dist/share/Geant4-11.0.1/data/PhotonEvaporation5.7 setx G4RADIOACTIVEDATA D:/Geant4/dist/share/Geant4-11.0.1/data/RadioactiveDecay5.6 setx G4PARTICLEXSDATA D:/Geant4/dist/share/Geant4-11.0.1/data/G4PARTICLEXS4.0 setx G4PIIDATA D:/Geant4/dist/share/Geant4-11.0.1/data/G4PII1.3 setx G4REALSURFACEDATA D:/Geant4/dist/share/Geant4-11.0.1/data/RealSurface2.2 setx G4SAIDXSDATA D:/Geant4/dist/share/Geant4-11.0.1/data/G4SAIDDATA2.0 setx G4ABLADATA D:/Geant4/dist/share/Geant4-11.0.1/data/G4ABLA3.1 setx G4INCLDATA D:/Geant4/dist/share/Geant4-11.0.1/data/G4INCL1.0 setx G4ENSDFSTATEDATA D:/Geant4/dist/share/Geant4-11.0.1/data/G4ENSDFSTATE2.3
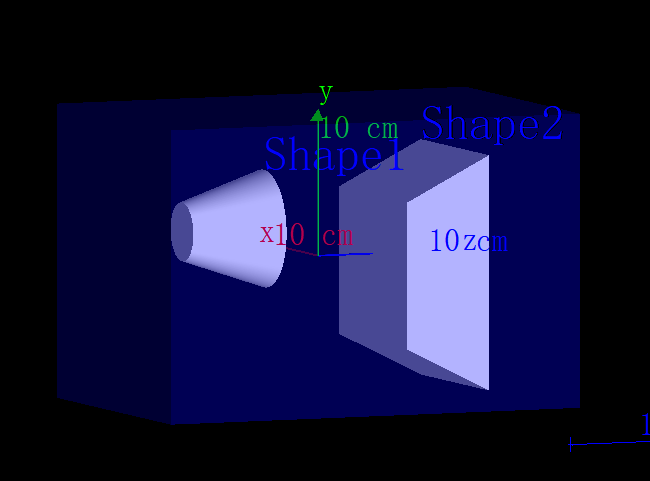
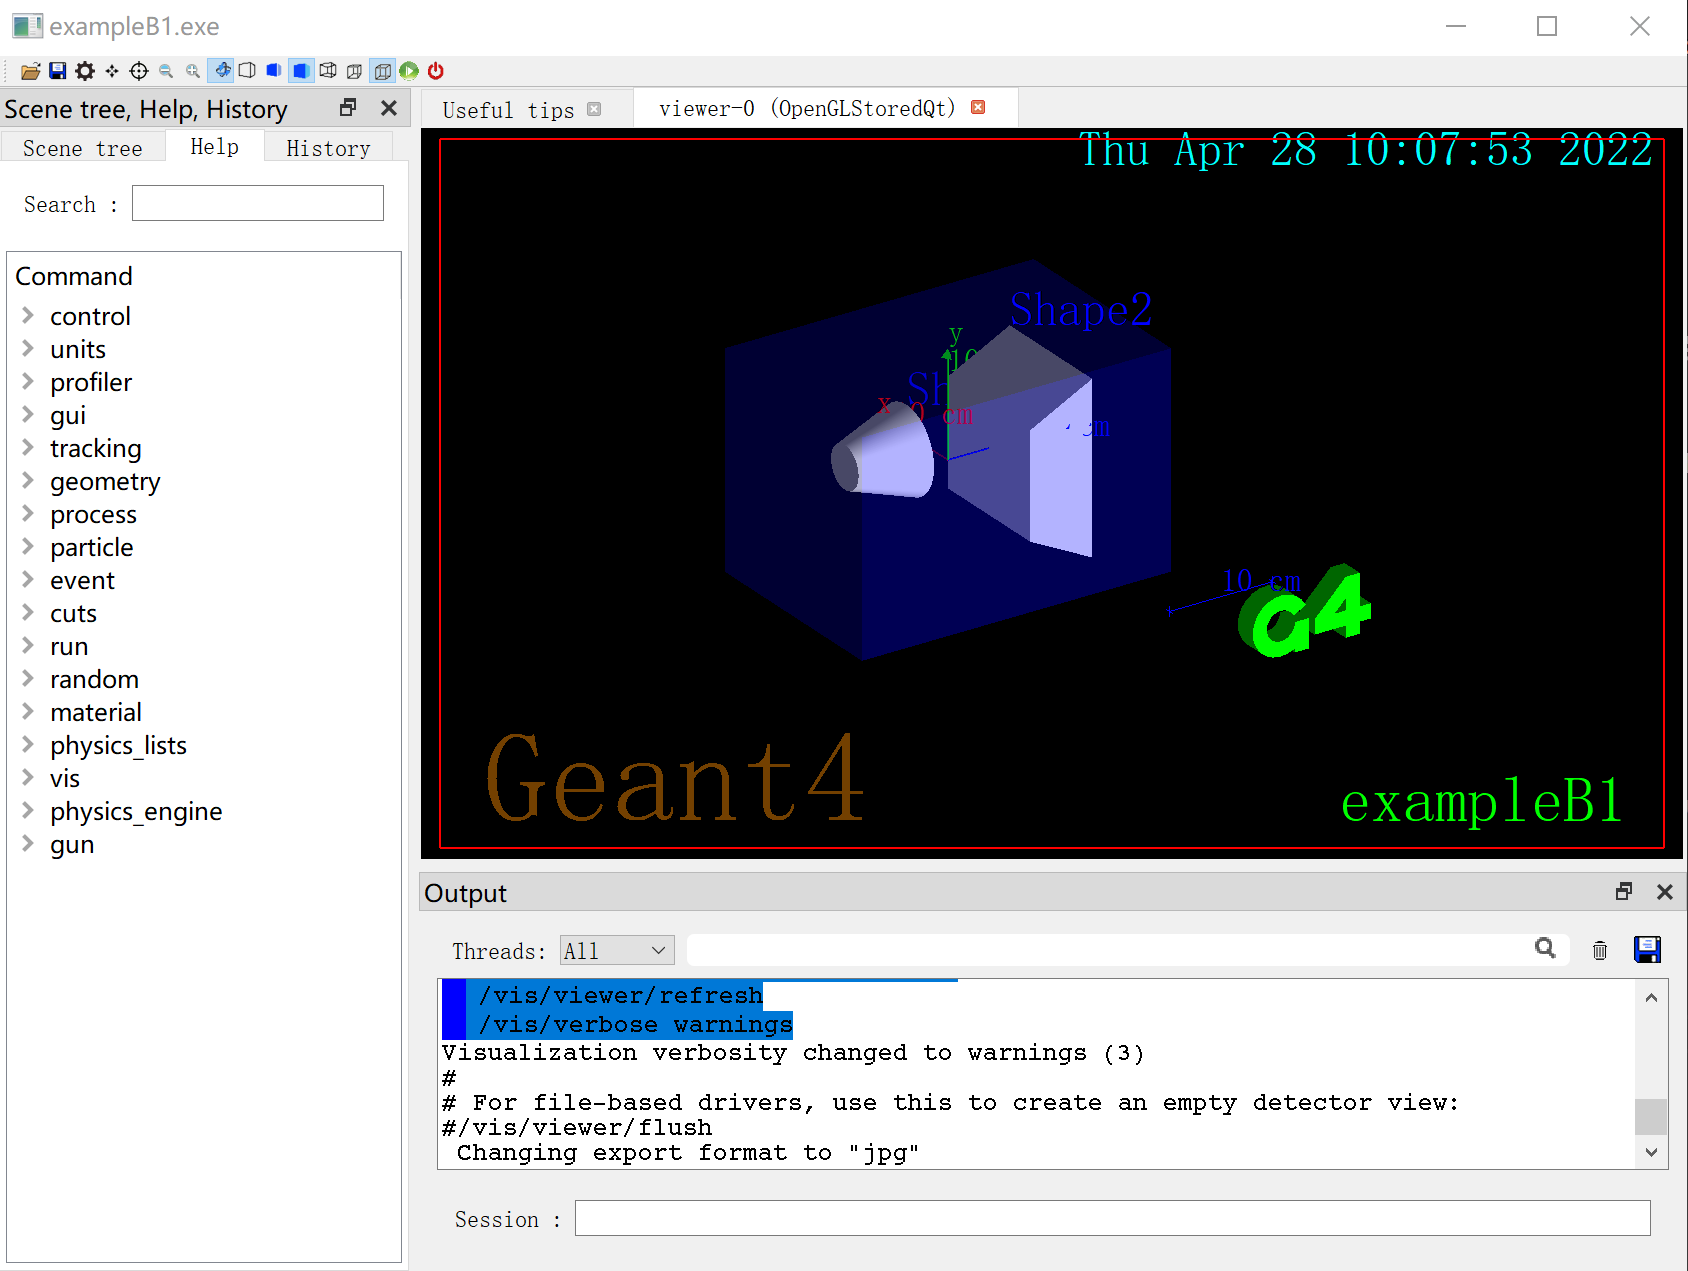
示例 example B1 B1 是用于计算吸收剂量的。几何模型可见图 8,半透明的蓝色长方体中填充了水(G4_WATER),外界为空气。在长方体内部有两个物体,第一个圆台状物体的材料为人体组织(G4_A-150_TISSUE),第二个梯形状物体的材料为骨(G4_BONE_COMPACT_ICRU)。
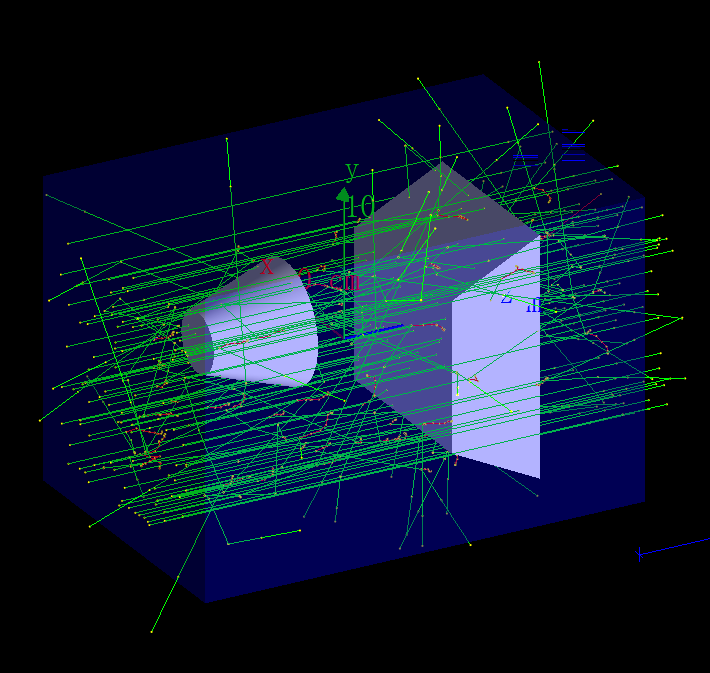
粒子从圆台状物体的前方入射,分布范围是长方体前侧面积的 80%,从图 9 可以看出,有些粒子在长方体内与水发生反应,直接散射出去;有些粒子直接射在骨中;有些粒子经过组织后入射到骨中。通过计算粒子在骨中沉积的能量,再除以骨的质量,我们可以得到整个骨的平均吸收剂量。
试运行 在D:\Geant4\dist\share\Geant4-11.0.1\examples目录下有很多Geant4的示例代码,我们将basic/B1示例复制到~/exampleB1目录下,改名为source,并创建同级目录build:
1
2
3
> mkdir -p ~/exampleB1/source > Copy -Item D:\Geant4\dist\share\Geant4-11 .0 .1 \examples\B1 -Recurse ~/exampleB1/source > mkdir -p ~/exampleB1/build
进入build目录进行构建,Geant4_DIR是Geant4库文件的安装目录,CMAKE_INSTALL_PREFIX是最终文件的目录:
1
2
> cd build > cmake -DGeant4_DIR="D:\Geant4\dist\lib\Geant4-11 .0 .1 " -DCMAKE_INSTALL_PREFIX="~/exampleB1/disk" "~/exampleB1/source"
构建后会在build目录下生成一个.sln文件,可以使用Visual Studio打开并编译,也可以使用命令行如下:
1 > cmake --build . --config Release --target install
编译后会在~/exampleB1/disk/bin目录下生成一个.exe文件,运行该文件还需要.mac文件,因此我们复制build目录下的所有.mac文件到~/exampleB1/disk/bin目录下,进入~/exampleB1/disk/bin目录,运行.exe文件。
1
2
3
> cp *.mac ~\exampleB1\disk\bin\ > cd ~/exampleB1/disk/bin > .\exampleB1.exe
分析 1 2 3 4 5 6 7 8 9 . |-- include | |-- *.hh |-- src | `-- *.cc |-- CMakeLists.txt |-- GNUmakefile |-- exampleB1.cc `-- *.mac
目录下主要有include和src两个目录,存放的是自定义的头文件及其源文件;CMakeLists.txt,GNUmakefile是用于编译的配置文件,我们只需要用到CMakeLists.txt;exampleB1.cc是程序的主文件,程序入口也在该文件中;*.mac可以存储需要运行的命令,作为脚本运行。
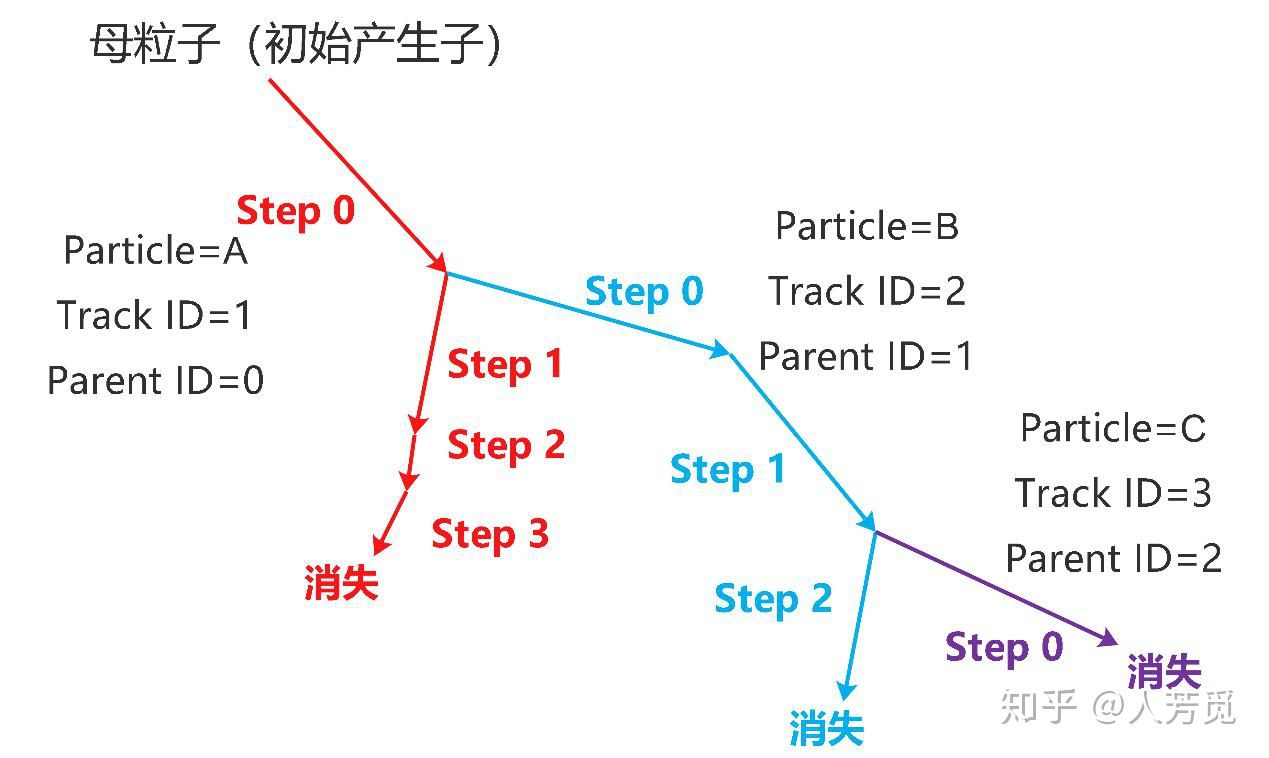
Geant4中主要有 4 个概念,分别为Run,Event,Step,Track:
Run:一次模拟过程,注意一个程序中可以进行多次模拟Event:一次入射事件,每次入射事件可能入射多个粒子,注意包含次级粒子的反应过程Step:某个粒子一次模拟的过程,是模拟的最小单位,包含有起始位置、花费时间、能量增量等粒子信息Track:粒子的信息,包含有该粒子的Step的信息在Geant4中,有一些类需要有用户自行定义,其中某些类是必须的(强制类)。在主程序中,我们需要自己编写main函数,并至少创建运行管理类,将强制类设置到运行管理类中。下面我们按照模拟的流程介绍B1示例,其中G4VUserDetectorConstruction、G4VUserPhysicsList和G4VUserPrimaryGeneratorAction(或其派生类)是Geant4的 3 个强制类。
几何体类 我们需要从G4VUserDetectorConstruction类派生出具体类,并且在虚函数Construct中定义几何体的几何框架、材料,并进行放置。在DetectorConstruction.hh文件中,我们定义了DetectorConstruction类,其中Construct将会实现具体的构造,而fScoringVolume用于计算剂量,指定为梯形状物体(即shape2)。
DetectorConstruction.hh 1 2 3 4 5 6 7 8 9 class DetectorConstruction : public G4VUserDetectorConstruction {public : DetectorConstruction (); ~DetectorConstruction () override ; G4VPhysicalVolume* Construct () override ; G4LogicalVolume* GetScoringVolume () const { return fScoringVolume; } protected : G4LogicalVolume* fScoringVolume = nullptr ; };
Geant4 中一个几何体需要设置几何框架(solid)、材料(logic)、放置(physical)等操作,其中最大的几何体被称为World volume,它应该所有其他的几何体。
定义几何框架首先需要指定形状,例如长方体、圆柱、空心圆柱、圆锥等等(可参见 Solids )。在本例中使用的是长方体,需要注意的是尺寸都是半数:
DetectorConstruction.cc 1 G4Box* solidWorld = new G4Box ("World" , x_length, y_length, z_length);
随后我们需要查找材料,部分材料在前文已经提到过,例如水(G4_WATER)、组织(G4_A-150_TISSUE)、骨(G4_BONE_COMPACT_ICRU)和空气(G4_AIR)等等(可参见 Material )。材料的管理是通过G4NistManager类实现的:
DetectorConstruction.cc 1 2 G4NistManager* nist = G4NistManager::Instance (); G4Material* world_mat = nist->FindOrBuildMaterial ("G4_AIR" );
然后将几何框架与材料结合,构建Logical Volumes,只负责记录物体的几何特性,并增加了物理特性,包括材料、探针、磁场等,而不记录物体的位置信息:
DetectorConstruction.cc 1 G4LogicalVolume* logicWorld = new G4LogicalVolume (solidWorld, world_mat, "World" );
最后需要将几何体放置到环境中,使用G4PVPlacement进行,返回值是一个Logical Volumes的实例,被称为Physical Volume。由于Construct函数需要返回最大环境的物理体,因此我们通过physWorld变量进行这一操作:
DetectorConstruction.cc 1 2 3 4 5 6 7 8 G4VPhysicalVolume* physWorld = new G4PVPlacement (0 , G4ThreeVector (), logicWorld, "World" , 0 , false , 0 , true );
仿照上面的过程,我们可以定义水箱Envelope、圆台状物体Shape1和梯形状物体Shape2,并且将它们放置在Mother Logical Volumes中,而且Logical Volumes中可以包含多个物体:
DetectorConstruction.cc 1 2 3 4 5 6 7 8 9 10 11 12 13 G4Material* env_mat = nist->FindOrBuildMaterial ("G4_WATER" ); G4Box* solidEnv = new G4Box ("Envelope" , x_length, y_length, z_length); G4LogicalVolume* logicEnv = new G4LogicalVolume (solidEnv, env_mat, "Envelope" ); new G4PVPlacement (0 , G4ThreeVector (), logicEnv, "Envelope" , logicWorld, false , 0 , true ); ...shape1. .. new G4PVPlacement (0 , pos1, logicShape1, "Shape1" , logicEnv, false , 0 , true );...shape2. .. new G4PVPlacement (0 , pos2, logicShape2, "Shape2" , logicEnv, false , 0 , true );
物理类 G4VUserPhysicsList 或其派生类用于定义模拟中使用的所有粒子、物理过程和截止范围,而物理过程用于描述粒子与材料的相互作用过程。PhysicsList是需要由用户指定或定义的类,一般情况下我们都会使用Geant4提供的物理过程,例如本例中的QBBC一般用于医学剂量评估和空间辐射物理的模拟,适用于需要精确模拟质子和中子的低能量传输的场景,对于薄靶实验,当粒子能量低于 1 GeV 时,有很好的效果。
exampleB1.cc 1 G4VModularPhysicsList* physicsList = new QBBC;
主事件生成类 产生初级粒子的Event被称为Primary Events,我们可以理解为粒子源,由G4VUserPrimaryGeneratorAction或其派生类进行定义,而实际粒子的产生则有G4VPrimaryGenerator或其派生类负责。G4VuserPrimaryGeneratorAction有一个函数为GeneratePrimaries,在每个Event开始时都会调用此方法。
PrimaryGeneratorAction.hh 1 2 3 4 5 6 7 8 9 10 class PrimaryGeneratorAction : public G4VUserPrimaryGeneratorAction {public : PrimaryGeneratorAction (); ~PrimaryGeneratorAction () override ; void GeneratePrimaries (G4Event*) override const G4ParticleGun* GetParticleGun () const return fParticleGun; } private : G4ParticleGun* fParticleGun = nullptr ; G4Box* fEnvelopeBox = nullptr ; };
在GeneratePrimaries我们需要使用G4VPrimaryGenerator或其派生类生成实际的粒子。Geant4为我们提供了 3 个具体的类为:G4ParticleGun,G4GeneralParticleSource(被称为GPS)和G4HEPEvtInterface,在B1中使用的是G4ParticleGun。
G4ParticleGun可以生成具有给定动量和位置的初级粒子,不提供任何类型的随机化过程,但是在实际应用中我们经常需要一定的位置、能量的随机化,在B1例子中就需要在长方体前向面的 80% 范围内随机粒子的位置。我们可以在GeneratePrimaries函数中,调用自己编写的随机函数,生成随机的位置赋予给G4ParticleGun,然后再生成粒子。与G4ParticleGun相比,G4GeneralParticleSourceGPS可以定义初级粒子的能谱、空间和角分布等信息,可以更加灵活地实现随机源的生成。
PrimaryGeneratorAction.cc 1 2 3 4 5 6 7 8 9 10 11 12 void PrimaryGeneratorAction::GeneratePrimaries (G4Event* anEvent) G4double envSizeXY = xy; G4double envSizeZ = z; G4double size = 0.8 ; G4double x0 = size * envSizeXY * (G4UniformRand () - 0.5 ); G4double y0 = size * envSizeXY * (G4UniformRand () - 0.5 ); G4double z0 = -0.5 * envSizeZ; fParticleGun->SetParticlePosition (G4ThreeVector (x0, y0, z0)); fParticleGun->GeneratePrimaryVertex (anEvent); }
当然,在Event之前我们需要初始化,创建G4ParticleGun实例,并在Event结束后销毁。
PrimaryGeneratorAction.cc 1 2 3 4 5 6 7 8 9 10 11 12 13 14 PrimaryGeneratorAction::PrimaryGeneratorAction () { G4int n_particle = 1 ; fParticleGun = new G4ParticleGun (n_particle); G4ParticleTable* particleTable = G4ParticleTable::GetParticleTable (); G4ParticleDefinition* particle = particleTable->FindParticle ("gamma" ); fParticleGun->SetParticleDefinition (particle); fParticleGun->SetParticleMomentumDirection (G4ThreeVector (0. , 0. , 1. )); fParticleGun->SetParticleEnergy (6. * MeV); } PrimaryGeneratorAction::~PrimaryGeneratorAction () { delete fParticleGun; }
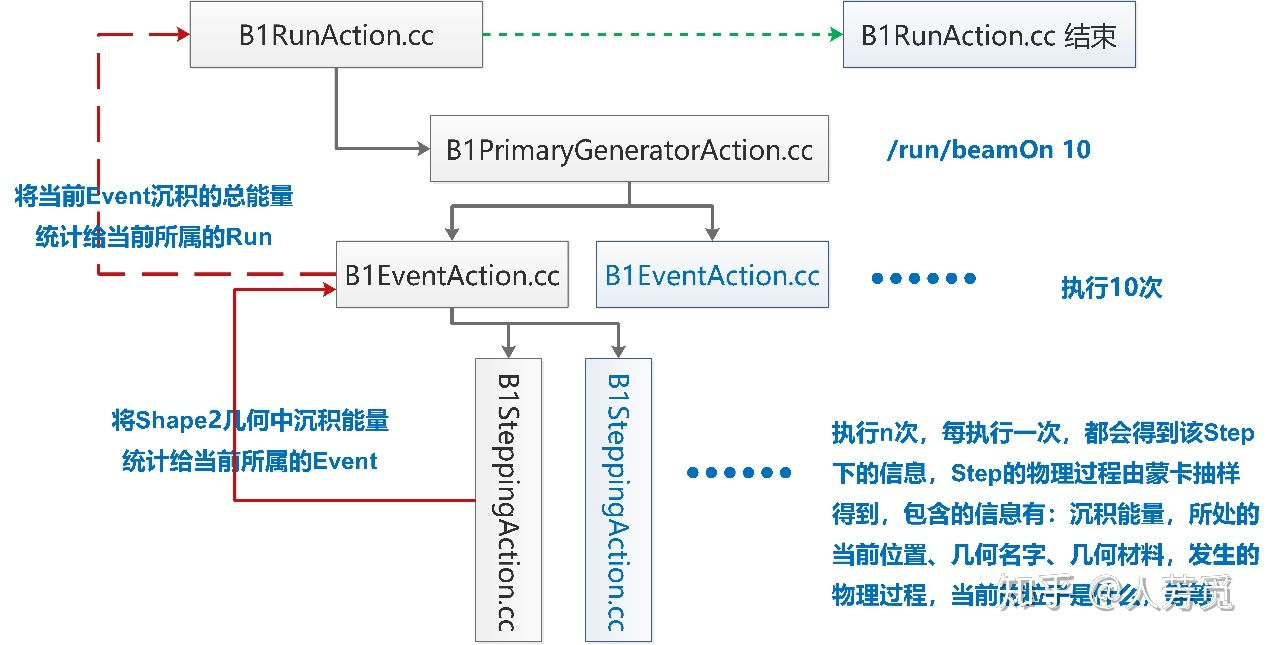
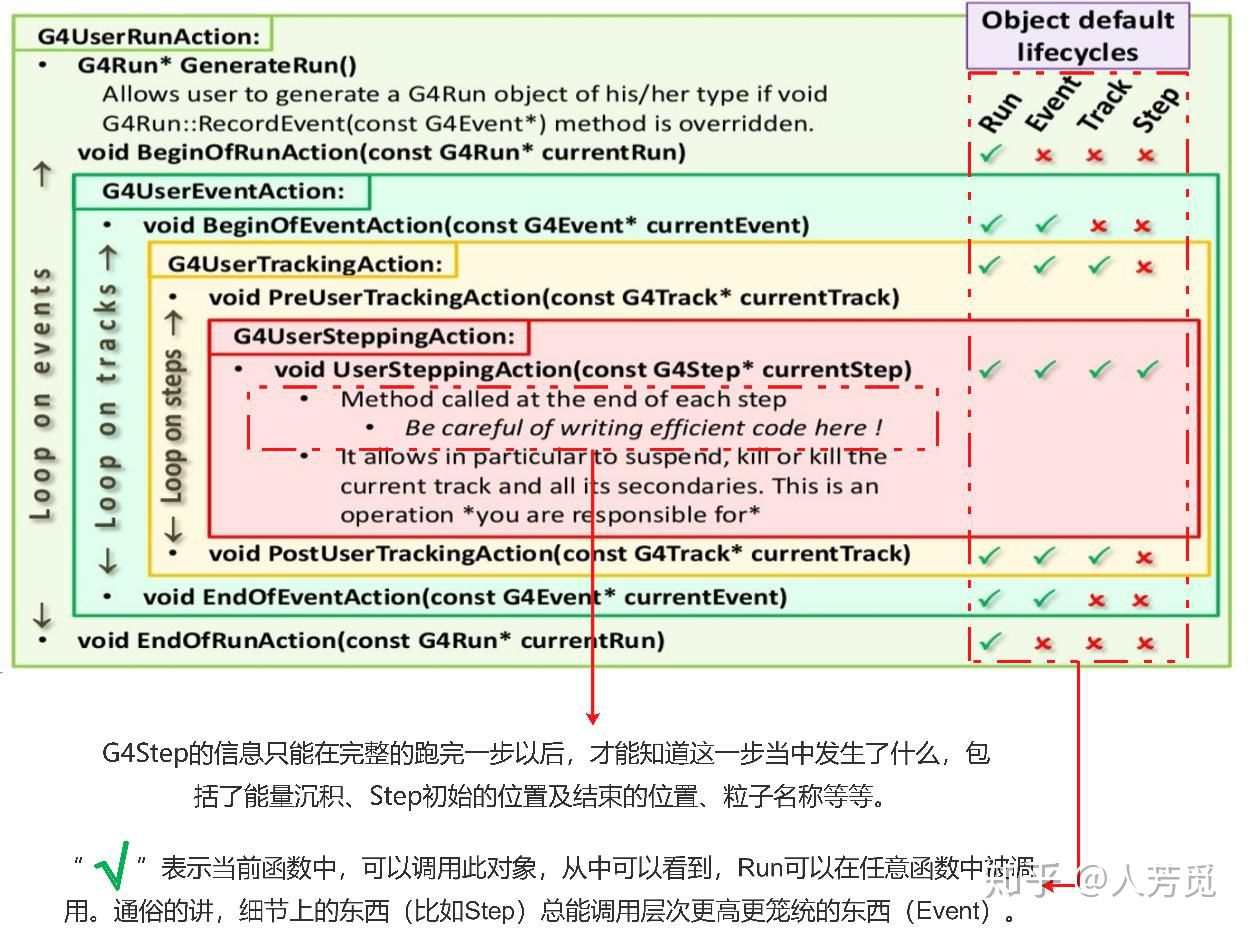
用户行为类 对于模拟中Run,Event,Step,Track等各个阶段,我们都可以自定义相应的行为,来实现我们需要的效果,例如统计某个物体内的沉积能量,剂量随深度的变化曲线等等。
在B1中我们需要获取几何体Shape2的吸收剂量,所以我们需要获得粒子在其中损失的能量,这一部分信息被记录在Step中,因此可以根据以下的逻辑实现吸收剂量的统计:判断当前Step是否在Shape2中,如果在,则将沉积能量累加给当前Event的一个统计变量eDep,在当前Event结束时,再将eDep统计给当前Run,在当前Run结束时,通过计算总沉积能量与Shape2的质量比值来得到吸收剂量。
相应的,我们需要在Run,Event,Step这 3 个阶段,定义行为来实现统计与返回:
SteppingAction.hh 1 2 3 4 5 6 7 8 9 10 11 12 13 14 15 16 17 18 19 20 21 22 23 24 25 26 27 28 29 30 31 32 33 34 class EventAction ;class SteppingAction : public G4UserSteppingAction {public : SteppingAction (EventAction* eventAction); ~SteppingAction () override ; void UserSteppingAction (const G4Step*) override private : EventAction* fEventAction = nullptr ; G4LogicalVolume* fScoringVolume = nullptr ; }; SteppingAction::SteppingAction (EventAction* eventAction) : fEventAction (eventAction) {} void SteppingAction::UserSteppingAction (const G4Step* step) if (!fScoringVolume) { const DetectorConstruction* detConstruction = static_cast <const DetectorConstruction*>(G4RunManager::GetRunManager ()->GetUserDetectorConstruction ()); fScoringVolume = detConstruction->GetScoringVolume (); } G4LogicalVolume* volume = step->GetPreStepPoint ()->GetTouchableHandle ()->GetVolume ()->GetLogicalVolume (); if (volume != fScoringVolume) return ; G4double edepStep = step->GetTotalEnergyDeposit (); fEventAction->AddEdep (edepStep); }
EventAction.hh 1 2 3 4 5 6 7 8 9 10 11 12 13 14 15 16 17 18 19 20 21 22 23 24 25 26 27 class RunAction ;class EventAction : public G4UserEventAction {public : EventAction (RunAction* runAction); ~EventAction () override ; void BeginOfEventAction (const G4Event* event) override void EndOfEventAction (const G4Event* event) override void AddEdep (G4double edep) private : RunAction* fRunAction = nullptr ; G4double fEdep = 0. ; }; EventAction::EventAction (RunAction* runAction) : fRunAction (runAction) {} void EventAction::BeginOfEventAction (const G4Event*) 0. ; }void EventAction::EndOfEventAction (const G4Event*) fRunAction->AddEdep (fEdep); }
RunAction.hh 1 2 3 4 5 6 7 8 9 10 11 12 13 14 15 16 17 18 19 20 21 22 23 24 25 26 27 28 29 30 class RunAction : public G4UserRunAction {public : RunAction (); ~RunAction () override ; void BeginOfRunAction (const G4Run*) override void EndOfRunAction (const G4Run*) override void AddEdep (G4double edep) private : G4Accumulable<G4double> fEdep = 0. ; G4Accumulable<G4double> fEdep2 = 0. ; }; void RunAction::EndOfRunAction (const G4Run* run) G4int nofEvents = run->GetNumberOfEvent (); if (nofEvents == 0 ) return ; G4AccumulableManager* accumulableManager = G4AccumulableManager::Instance (); accumulableManager->Merge (); G4double edep = fEdep.GetValue (); const DetectorConstruction* detConstruction = static_cast <const DetectorConstruction*>(G4RunManager::GetRunManager ()->GetUserDetectorConstruction ()); G4double mass = detConstruction->GetScoringVolume ()->GetMass (); G4double dose = edep / mass; }
初始化与管理类 实现了各种强制类和用户行为的定义后,我们需要回到main函数,将这些类添加到运行中,其中首先要做的就是创建G4RunManager类的一个实例,它负责管理整个模拟进程的运行与循环,有多线程下的G4MTRunManager类和其他情况下的G4RunManager类两种,通过G4RunManagerFactory可以自动识别是否创建多线程类。
exampleB1.cc 1 auto * runManager = G4RunManagerFactory::CreateRunManager (G4RunManagerType::Default);
G4RunManager 还负责进行初始化,即前文所说的强制类与用户行为。为了方便进行初始化,我们从G4VUserActionInitialization派生出ActionInitialization用于统筹所有的用户自定义行为和粒子生成:
ActionInitialization.hh 1 2 3 4 5 6 7 8 9 10 11 12 13 14 15 16 17 18 19 20 21 22 23 24 class ActionInitialization : public G4VUserActionInitialization {public : ActionInitialization (); ~ActionInitialization () override ; void BuildForMaster () const override void Build () const override }; void ActionInitialization::BuildForMaster () const RunAction* runAction = new RunAction; SetUserAction (runAction); } void ActionInitialization::Build () const SetUserAction (new PrimaryGeneratorAction); RunAction* runAction = new RunAction; SetUserAction (runAction); EventAction* eventAction = new EventAction (runAction); SetUserAction (eventAction); SetUserAction (new SteppingAction (eventAction)); }
随后我们在G4RunManager中设置用户初始化为ActionInitialization,同时加入其他的强制类:
exampleB1.cc 1 2 3 runManager->SetUserInitialization (new DetectorConstruction ()); runManager->SetUserInitialization (new QBBC); runManager->SetUserInitialization (new ActionInitialization ());
运行模式 Geant4 的运行可以分为 4 种模式:写在代码中的纯硬编码批处理模式、读取文件(macro of commands)的批处理模式、基于命令行的交互模式、基于图形界面的交互模式。一般情况下我们会使用图形界面的交互模式进行Debug与展示,通过读取文件的批处理模式进行实际模拟,因此我们也可以在代码中实现两种模式的切换。
在main函数的参数中,会有argc提供命令参数的个数,字符串数组argv提供具体的命令参数,而默认的第一个参数是可执行文件本身,因此我们可以根据参数的个数,进行模式的判断:
exampleB1.cc 1 2 3 4 5 6 7 8 9 10 11 12 13 14 15 16 17 18 19 20 21 int main (int argc, char ** argv) G4UIExecutive* ui = nullptr ; if (argc == 1 ) { ui = new G4UIExecutive (argc, argv); } ... if (!ui) { G4String command = "/control/execute " ; G4String fileName = argv[1 ]; UImanager->ApplyCommand (command + fileName); } else { UImanager->ApplyCommand ("/control/execute init_vis.mac" ); ui->SessionStart (); delete ui; } }
常用命令 在读取文件的批处理模式下,我们将需要用到的命令保存在.mac文件中,我们可以通过命令更改初始条件,指定发射粒子的类别、位置、能量等信息,改变几何、角度等。其中最常用的两条命令为:
1 2 /run/initialize // 初始化 /run/beamOn 1000 // 运行一次模拟,包含1000个粒子
此外,比较常用的命令还有:
粒子枪 1 2 3 /gun/particle proton // 设定为光子 /gun/energy 210 MeV // 能量为 210 MeV ...
输出控制verbose表示,用于控制输出的详细程度,当verbose=0时,不会有任何输出,后面的数字越大输出越详细,最大为 4。 1 2 3 4 /run/verbose 2 /event/verbose 1 /tracking/verbose 0 ...
网格划分在 Geant4 中关于 Command-based Scoring 基于命令计数器的用法 1 2 3 4 5 6 7 8 9 /score/create/boxMesh water_box // 定义一个网格 /score/mesh/boxSize 319. 315. 277.5 mm // 设置尺寸 /score/mesh/nBin 1 1 555 // 分bin的数目 /score/quantity/energyDeposit eDep // 想要获取的物理信息:剂量 /score/quantity/doseDeposit Dose // 想要获取的物理信息:沉积能量 /score/dumpQuantityToFile water_box eDep eDep_1.txt // 导出获取的物理信息:剂量 /score/dumpQuantityToFile water_box Dose Dose_1.txt // 导出获取的物理信息:沉积能量
更多的命令或者命令的说明,可以在 GUI 模式下的左侧帮助手册中查询,也可以查看推荐阅读材料中的Geant4 Commands进行在线查询。
水箱模型 放疗水箱常用于放疗装置的剂量校准,其尺寸为(x = 638mm,y = 630mm,z = 555mm)。现假设一笔形束从 x-y 平面中心处,自水箱外向下射入放疗水箱。请用Geant4模拟计算不同能量的光子(1MeV、5MeV、10MeV)入射后在放疗水箱的 z 方向上的吸收剂量变化曲线。
这是一个非常简单的示例,首先定义几何体:
1 2 3 4 G4NistManager* nist = G4NistManager::Instance (); G4Box* solid_world = new G4Box ("world" , 638 / 2 * mm, 630 / 2 * mm, 555. / 2 * mm); G4LogicalVolume* logic_world = new G4LogicalVolume (solid_world, nist->FindOrBuildMaterial ("G4_WATER" ), "world" ); G4VPhysicalVolume* physics_world = new G4PVPlacement (0 , G4ThreeVector (), logic_world, "world" , 0 , false , 0 , true );
随后在.mac中进行网格划分与模拟:
1 2 3 4 5 6 7 8 9 10 11 12 13 14 15 16 17 18 19 20 21 22 23 /score/create/boxMesh water_box /score/mesh/boxSize 319. 315. 277.5 mm /score/mesh/nBin 1 1 555 /score/quantity/energyDeposit eDep /score/quantity/doseDeposit Dose /score/close /gun/particle gamma /gun/energy 1 MeV /run/beamOn 100000 /score/dumpQuantityToFile water_box eDep eDep_1.txt /score/dumpQuantityToFile water_box Dose Dose_1.txt /gun/energy 5 MeV /run/beamOn 100000 /score/dumpQuantityToFile water_box eDep eDep_5.txt /score/dumpQuantityToFile water_box Dose Dose_5.txt /gun/particle gamma /gun/energy 10 MeV /run/beamOn 100000 /score/dumpQuantityToFile water_box eDep eDep_10.txt /score/dumpQuantityToFile water_box Dose Dose_10.txt
其余部分参考B1示例。
附录 示例源码 exampleB1 带注释代码 水箱模型 CMakeLists 很多人在尝试编译示例时,会有以下错误:
1 2 3 4 5 6 7 8 9 10 11 12 13 14 15 CMake Error at CMakeLists.txt:16 (find_package): By not providing "FindGeant4.cmake" in CMAKE_MODULE_PATH this project has asked CMake to find a package configuration file provided by "Geant4", but CMake did not find one. Could not find a package configuration file provided by "Geant4" with any of the following names: Geant4Config.cmake geant4-config.cmake Add the installation prefix of "Geant4" to CMAKE_PREFIX_PATH or set "Geant4_DIR" to a directory containing one of the above files. If "Geant4" provides a separate development package or SDK, be sure it has been installed.
可以在CMakeLists.txt文件中添加一行即可解决:
1 2 3 4 cmake_minimum_required (VERSION 3.16 )set (Geant4_DIR D:/Geant4/dist/lib/Geant4-11.0 .1 )project (exampleB0)...
参考资料 Installation Guide Geant4 入门教程 Geant4 学习 —— 入门 (基本概念、Geant4 工具包的结构、强制类、可选类) Geant4–是怎样使用的?–(1. 信息抽取) Geant4 入门讲解篇 - 1 推荐阅读 Book For Application Developers Physics Reference Manual Guide for Physics Lists Geant4 Commands liuchangqi 在 Geant4 中关于 Command-based Scoring 基于命令计数器的用法 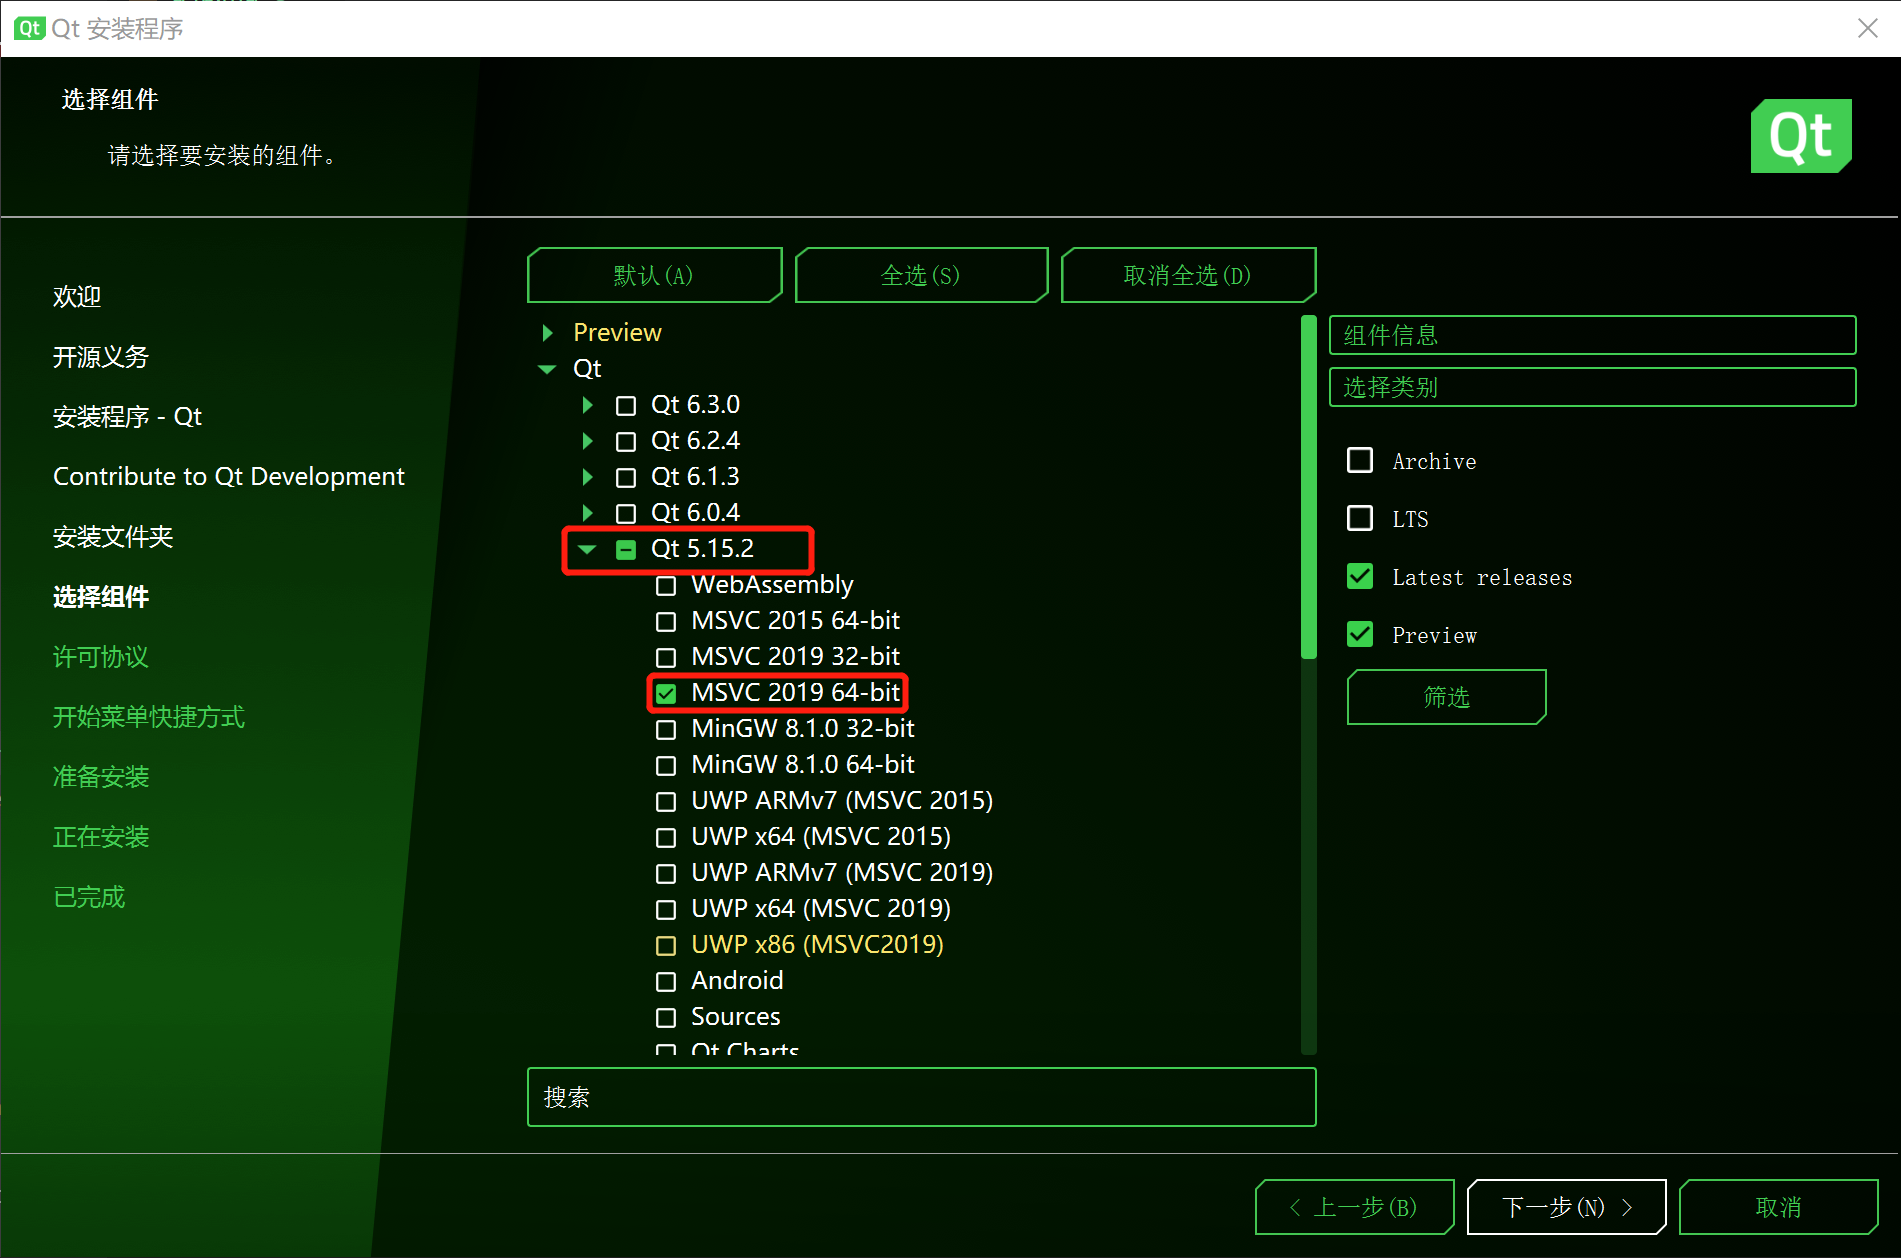


 wechat